 If you like to read and devote a lot of time to this hobby, most likely you have a rather large collection of books. Even if it is just starting to grow, it’s still better to think about creating a durable and beautiful shelf in advance. Books need an appropriate place where they will always stand beautifully, delighting you with their bindings.
For manufacturing, you need to choose and stock up on materials and decide on the type of shelf that you want to receive. In our article, we will share various ways to create a stand with our own hands and tell you the options for its implementation.
What material is suitable for the manufacture of bookshelves
 To make a shelf, you can choose almost any material. It does not require special operating conditions and technical requirements. The main task for them is to maintain the design and storage of books. This requires the strength of the shelves and reliable fastening to the walls. Wood, metal or durable plastic products will do just fine with this. You can also combine in the design several types of material for decoration.
The most convenient to use and pleasant appearance is wood, so it is best to use this raw material.
IMPORTANT! When choosing a tree, it is necessary to process it with sandpaper and varnish. Allow the product to dry and only then place the books.
Do-it-yourself bookcase with one section
 The easiest to implement will be a product with one section. It is suitable for a small number of books. If there are a lot of them, you can make several of these designs or make one, but longer. The simplicity of design and mounting allows you to create this option for almost anyone, without requiring special knowledge and skills. You will need:
- ruler with a pencil;
- measuring instruments;
- hammer and nails;
- self-tapping screws;
- wooden boards;
- furniture screws;
- hacksaw.
Drawing of a closed shelf with one section
Before you begin, you must create a drawing. To do this, select the place of the future shelf and make the necessary measurements so that it blends harmoniously into the interior. After that, you should create a sketch on graph paper. Draw the contours of the shelf in several projections for convenience. Depending on the design, the shelf may consist of a different number of parts.

You can simply attach one board along the wall or make a small box. The most confident is the shelf with the top cover. Such a stand can hold literature inside the case and on top of the cover.
IMPORTANT! Correctly select the height of the shelf so that books of different sizes fit in it, while the stock should not be made too large.
Step-by-step production of the shelf on the wall
 After building the circuit, you can get to work. Here is a sample procedure for creating a shelf:
- Saw off the details of the required dimensions according to the constructed drawing.
- Treat the wood and give it a smooth shape.
- Fasten all the parts together using furniture screws, and mask all the joints with plugs in the color of wood.
- The easiest way to fasten would be to use nails and self-tapping screws, but at the same time, the part can chip or crack.
- Mount the product on the wall. This can be done with the help of special fixing corners or made holes in the wall and screw the hooks into them on which the product will be hung.
IMPORTANT! All stages of the work should be carried out with the help of a level so that the shelf is kept steady and looks beautiful.
Do-it-yourself wall shelf with several sections
 If you want to divide your collection by genres and authors, or you just need a place to store additional accessories, in this case you should pay attention to the design of shelves with several sections. Thanks to the presence of inserts, you can create interesting images and give the design an unusual shape, and the presence of additional compartments will allow you to nicely and evenly arrange all things.
Such products are suitable for houses with a large free wall area, since they take up a lot of space. Performing them is a bit more complicated than the previous model. Materials and tools will be required the same, but more boards need to be taken.
Shelf drawing
For the drawing, it is necessary to use the parameters of the place where the structure will be installed. We suggest using our shelf drawing. You can print it or redraw it on paper manually.

For beauty, you can make a shelf in the shape of a square, but the internal compartments can be made with rectangles of different sizes. There are also various collapsible installation methods.
Shelf making step by step
The order of execution of such a shelf is almost no different from the usual version, only details are added that divide the space between them.
- Saw boards according to the product outline.
- Process the material with a grinding machine or sandpaper. If necessary, coat the surface with a layer of varnish or paint.
- First, assemble the outer walls, connecting them together.
- After that, boards should be installed in the main frame to divide the structure into sections. To do this, insert the boards at the designated points and fix them with the furniture screws.
- Close all openings with plugs.
- Proceed with the installation of the shelf. Be careful and make more fasteners, since the weight of such a product is more than a simple option.
Interesting do-it-yourself shelves for books
You can be creative in solving this issue and create a whole work of art. There is no specific sketch for interesting options, since there are a lot of them. Turn on your imagination, look at unusual images of your version, or repeat the existing one.


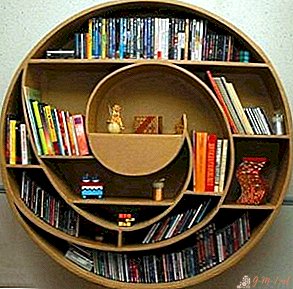
We will talk about one of the ways. It is quite simple to manufacture and at the same time looks interesting on the wall. It is a spiral shape resembling a snail.
IMPORTANT! When creating a design, do not forget about the strength of the structure and its main task.
Fancy Shelf Drawing
 To create such a shelf, it is necessary to calculate the turns of the spiral and select all sizes. It is important to understand that the external part will be connected and held by wooden shelves installed in the wall. For the manufacture of the outer wall you need a material that bends well and does not break. For this, plywood sheets are excellent. In order to achieve the desired length, it is possible to fasten several such sheets together using paper clips or small nails.
On paper, depict the main details: several levels of boards and a plywood spiral. It is important to consider the increase in its diameter as it unwinds.
How to make an unusual bookshelf with your own hands
In this case, they begin immediately with the fastening of the boards, and then everything else is added.
 Prepare all parts sawn according to the sketch. Treat them and cover with varnish or impregnation.
- Install wood planks with wall mounts parallel to the floor.
- After this, it is necessary to carefully twist the plywood panel along the product without sharp movements with medium pressure.
- At the junction of the plywood with wooden boards, they should be fastened with self-tapping screws or nails to prevent reverse unwinding.
 Prepare all parts sawn according to the sketch. Treat them and cover with varnish or impregnation.
Since all the parts are already fixed, and the plywood is firmly attached to them on the nails, then additional fasteners are not required. You can additionally colorize your work and add jewelry.
DIY bookcase
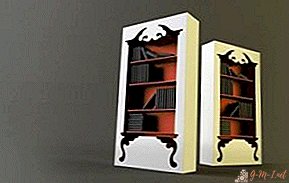
 If ordinary shelves are not enough for you, you can create a whole bookcase specifically for books. You can make it mounted or put on its legs. In general, its body resembles a large wardrobe. Side walls connected to the bottom and cover. Wide boards are evenly inserted throughout the entire height. And from the bottom, legs or wheels are attached for ease of movement.
To create it, you will need all the same materials, drawing construction and tools. Installation does not take much time and does not cause difficulties.
How to decorate a handmade bookshelf
Decoration is not a mandatory element, but gives a very beautiful and interesting appearance. You can decorate a product in several ways:
 Paint it your favorite color.
- Do it yourself painting on wood.
- You can glue the tree with a film with patterns and various images.
- An interesting option would be to use figures of your favorite characters from books cut out of cardboard.
- Try to make decorative carvings.
 Paint it your favorite color.
Make your dreams come true and build a reliable and beautiful stand for your literary collection, create your own home library.
Leave Your Comment